Christmas Cherry Cheesecake Bars
Indulge in the ultimate holiday treat with these Christmas Cherry Cheesecake Bars. Creamy, rich, and layered with sweet cherry pie filling, these bars make for a delightful dessert that’s sure to impress. I’ve made these for family gatherings and work parties, and trust me, they never last long! The buttery, crisp graham cracker crust pairs perfectly with the smooth cheesecake, and the cherry topping adds such a festive flair that you’ll want to keep the recipe handy for years to come.
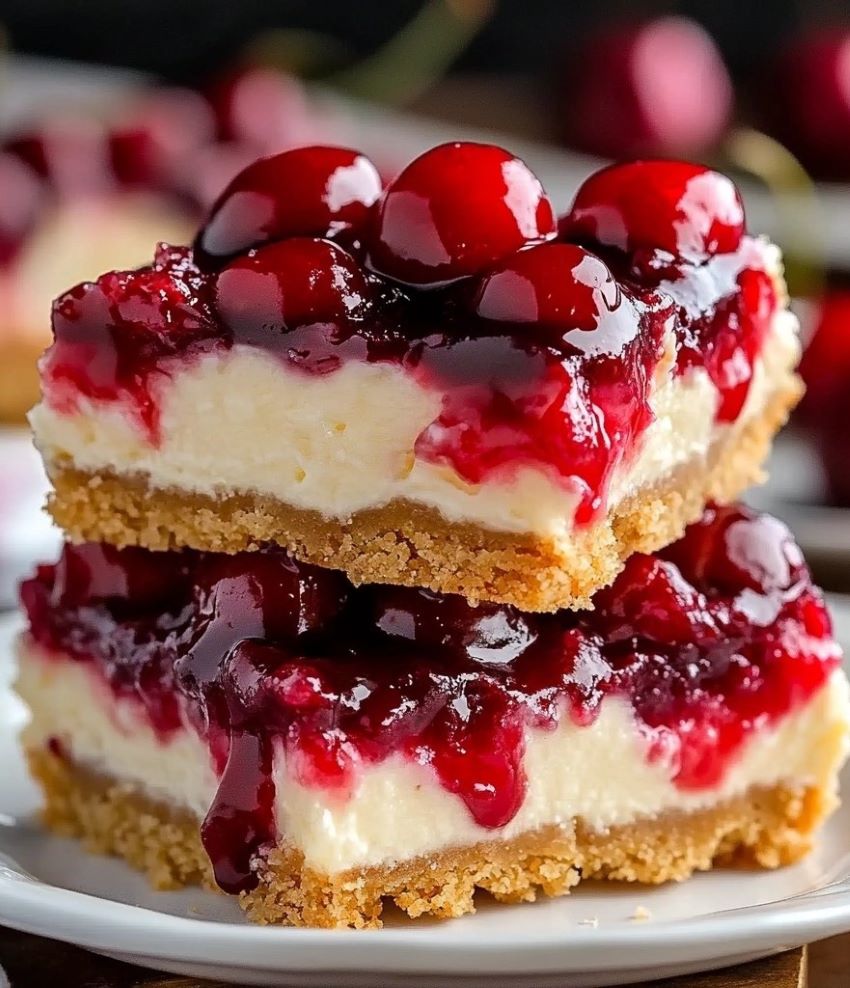
What I cherish most is how straightforward it is to prepare these bars. They marry the elegance of a cheesecake with the convenience of bar-style serving. Perfect for slicing, sharing, or just treating yourself, these cheesecake bars promise to be a favorite throughout the holiday season.
Why You’ll Love This Recipe
- Festive and Elegant: Ideal for holiday celebrations and gatherings.
- Easy to Make: Follow simple steps without the need for complex techniques.
- Make-Ahead Friendly: Prepare these in advance for effortless entertaining.
- Customizable Topping: Swap the cherries with strawberries, blueberries, or mixed berries based on your taste!
- Crowd-Pleaser: A dessert that looks as delightful as it tastes.
Recipe: Christmas Cherry Cheesecake Bars
Ingredients
For the Crust:
- 1 1/2 cups graham cracker crumbs
- 1/4 cup granulated sugar
- 1/2 cup unsalted butter, melted
For the Cheesecake Filling:
- 16 oz cream cheese, softened
- 1 cup granulated sugar
- 2 large eggs
- 1 teaspoon vanilla extract
For the Topping:
- 1 can (21 oz) cherry pie filling
Instructions
- Prepare the Crust:
- Preheat your oven to 325°F (165°C). Line a 9×13-inch baking pan with parchment paper, allowing for some overhang to ease removal later.
- In a medium bowl, combine the graham cracker crumbs, granulated sugar, and melted butter. Mix until the texture resembles wet sand.
- Firmly press this mixture into the bottom of your prepared pan using the back of a measuring cup.
- Bake for about 8–10 minutes, then allow it to cool while you prepare the filling.
- Make the Cheesecake Filling:
- In a large bowl, beat the softened cream cheese and granulated sugar together until the mixture is smooth and creamy.
- Incorporate the eggs one at a time, beating well after each addition.
- Add the vanilla extract and mix everything together until fully incorporated.
- Bake the Cheesecake Layer:
- Pour the cheesecake batter over your cooled crust, using a spatula to spread it evenly.
- Bake for 25–30 minutes, or until the edges are firm and the center is just slightly wobbly.
- Once done, remove it from the oven and let it cool completely in the pan.
- Add the Cherry Topping:
- Spread the cherry pie filling generously over the cooled cheesecake layer.
- Chill and Set:
- Cover the cheesecake and refrigerate it for at least 2 hours or until it is fully chilled and set.
- Slice and Serve:
- Use the parchment paper overhang to lift the bars out of the pan.
- Slice into squares, serve, and enjoy!
Serving and Storage Tips
- Serving: For the best texture and flavor, serve these bars chilled. Pair them with coffee or hot chocolate for a warm, cozy vibe.
- Storage: Store any leftovers in an airtight container in the refrigerator for up to 4 days.
- Freezing: You can freeze these bars (without the cherry topping) for up to 2 months. Thaw them in the fridge and add the topping before serving.
Helpful Notes
- For a firmer and more compact crust, make sure to press it down firmly when preparing it.
- If you’re looking to make a homemade topping, simmer fresh cherries with sugar and cornstarch until thickened for a delightful alternative.
FAQs
- Can I use a different fruit topping?
Absolutely! Feel free to experiment with strawberry, blueberry, or any mixed berry pie filling for delicious variations. - What if I don’t have a springform pan?
No worries! A standard 9×13-inch baking pan will work just fine, especially when lined with parchment paper to help with removal. - How do I prevent cracks in the cheesecake?
To avoid cracks, mix the batter gently and ensure you do not overbake it; a slightly jiggly center is the key to a creamy texture. - Can I prepare this ahead of time?
Yes! These cheesecake bars often taste even better the next day, so preparing them a day in advance is a smart choice. - Can I use low-fat cream cheese?
You can, but keep in mind that the texture may be less rich and creamy compared to using full-fat cream cheese, which yields the best flavor and consistency.