Delicious Chicken Patties Bento: A Flavorful Meal Prep Idea
Today’s featured Bento is the delightful Chicken Patties Bento. This vibrant meal incorporates pre-made dishes that you can whip up a day in advance or freeze for later. At the heart of this Bento are the savory pumpkin croquettes, complemented beautifully by succulent chicken patties. Colorful and packed with an array of amazing flavors, this Bento makes for a satisfying lunch option.
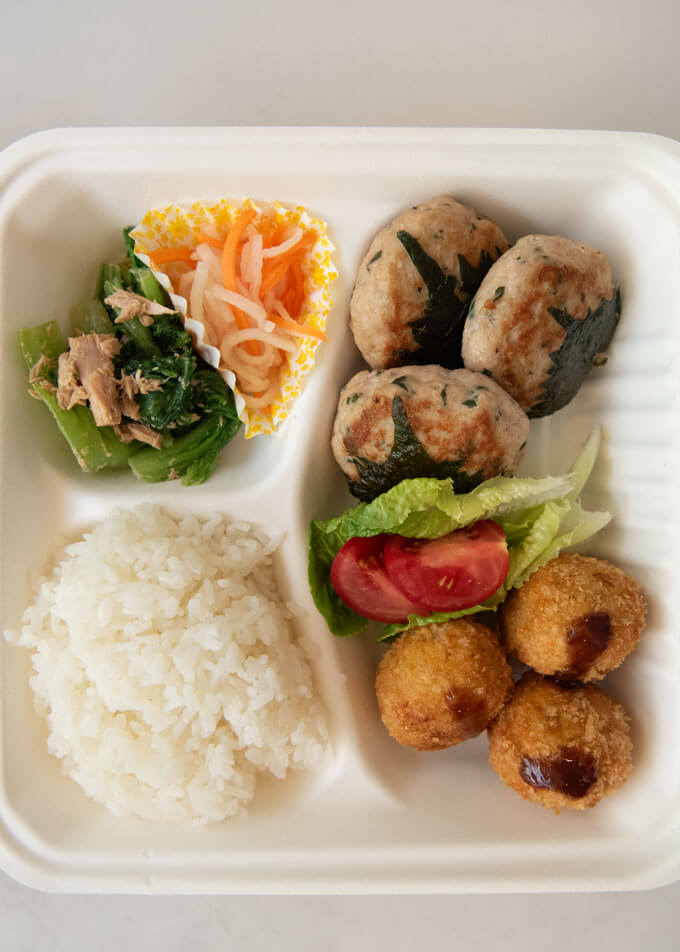
What’s in My Chicken Patties Bento

- Cooked Rice: Prepare rice ahead of time. It’s best packed while still warm, as it is easier to shape. Let it cool before adding the rest of your ingredients.
- Chicken Patties Wrapped in Perilla: You can fit either 2 or 3 chicken patties in the box, depending on your appetite and the size of your Bento.
- Pumpkin Croquettes: Adding pumpkin croquettes offers additional volume and flavor. You can prepare these in advance and freeze before frying, or you can fry them fresh on the day of packing.
- Pickled Carrot and Daikon (Kōhaku Namasu): For bursts of color and refreshing taste, this vinegar-based dressing pairs well with the other dishes. Experiment with other colorful sides, such as Pickled Chrysanthemum Radish or Sweet and Sour Pickled Red Cabbage.
- Baby Mustard Greens and Tuna Salad: This adds a refreshing contrast and a lovely green touch next to the pickles. The sesame-mayo dressing brings a delightful twist!
- A piece of lettuce leaf and tomato wedges: The lettuce serves as a nice divider while enhancing the overall visual appeal of your Bento.
You might sprinkle a bit of tonkatsu sauce over each croquette for an extra kick, but this is completely optional since the croquettes are flavorful on their own.
Packing Your Chicken Patties Bento
For this Bento, I’ve chosen to use an eco-friendly box made from sugarcane pulp, reducing plastic waste while enjoying my meal!

Even though my Bento box has just three compartments, I can effectively separate the ingredients using an okazu cup and some leafy greens. Below is the colorful okazu cup I picked up from Daiso – it’s also microwave-safe!

The largest compartment can hold your main dishes, while the smaller detailing gets the rice. Here’s how to pack it effectively:

- Start by placing the rice in the small compartment, ensuring it’s packed well.
- Next, add the chicken patties in one section of the larger compartment.
- Include a piece of lettuce beside the chicken before filling in the space with pumpkin croquettes.
- Take your Kōhaku Namasu and place it in an okazu cup, nestling it next to the rice.
- Finally, tuck in the baby mustard greens salad right next to the okazu cup.
- If desired, drizzle some tonkatsu sauce over the croquettes.
A small piece of romaine lettuce acts as a great divider. Remember, putting liquids in okazu cups helps keep your Bento neat.
About Disposable Chopsticks – Waribashi
With the growing popularity of Japanese cuisine, disposable chopsticks, or waribashi, have become increasingly common.

Waribashi originated during the 16th century in the Yoshino region of Nara, as a practical byproduct of the logging industry. The approach of connecting the ends so that you must snap them apart derives from the property of Yoshino cedar, which cleanly breaks when split.
Shapes of Waribashi
There’s an impressive variety of disposable chopstick designs available today:
- Genrokubashi: These are rectangular chopsticks featuring grooves for grip.
- Tensogebashi: Elegantly shaped with a diagonal cut at the handle. Commonly used in high-end dining.
- Takewaribashi: Known for their strength, these bamboo chopsticks add durability.
- Rikyuubashi: Thick in the center and tapered at the ends, they were created by tea master Sen no Rikyū for utility and elegance.
- Marubashi: Round chopsticks symbolizing a connection between divine and human eating rituals.
Materials Used in Waribashi
Traditionally, waribashi were made from various types of wood, such as cedar or bamboo. However, due to the high cost of domestic materials, many disposable chopsticks are now imported.