No-Bake Oreo Cheesecake: A Decadent Delight
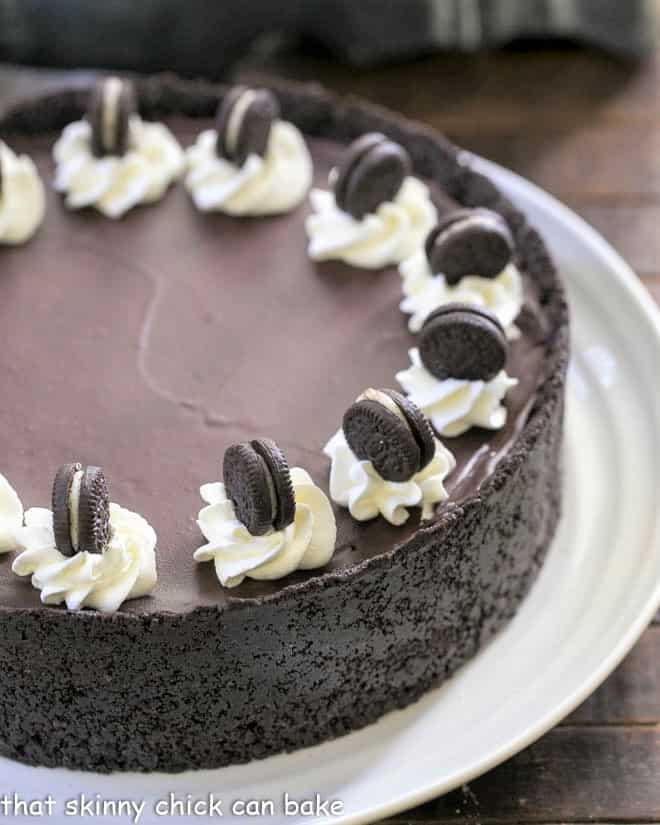
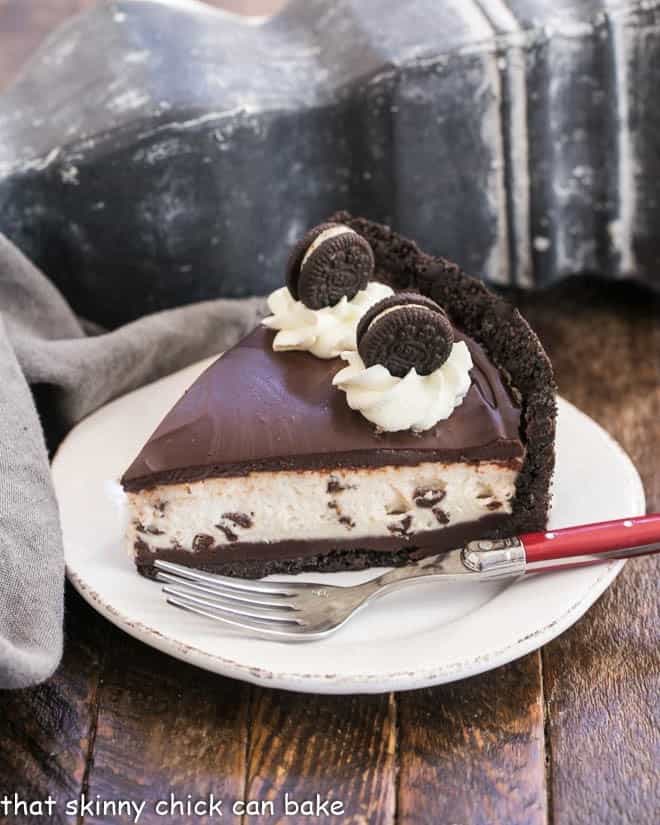
This No-Bake Oreo Cheesecake features a rich Oreo crust, delectable layers of ganache, and a creamy chocolate chip cheesecake filling that rivals any baked dessert. If you haven’t tried a No-Bake Cheesecake before, prepare to have your taste buds tantalized!
With its chocolate crust, mini chocolate chips, and layers of luscious chocolate ganache, this No-Bake Chocolate Cheesecake is a dessert that disappears quickly because it’s simply irresistible!

Why You Must Make This Cheesecake
- Get ready for a chocolate lover’s dream! The base features a tall, scrumptious Oreo crust.
- Enjoy two delightful layers of chocolate ganache—one beneath the cheesecake filling and one on top.
- The cheesecake filling is infused with vanilla and dotted with mini chocolate chips, while mini Oreos beautifully frame the dessert. You won’t be missing any chocolate here!
Using an entire package of Oreos for the crust may explain why I found myself sneaking bites over and over again! While I may not gravitate towards regular Oreo cookies, the allure of an Oreo crust is simply too strong. Completing this chocolate fantasy, I garnished it with mini Oreos and whipped cream for added indulgence.
Ingredient Notes
- Kitchen Staples: Use salted butter for a tasty balance.
- Regular Oreos: These should be processed in a food processor into fine crumbs for the crust.
- Mini Oreos: Optional for garnish, but they add a fun touch!
- Chocolate Chips: Both regular and mini for that extra chocolatey goodness.
- Cream Cheese: Ensure it’s at room temperature for easy mixing and a smooth filling. Use full blocks, not spreadable cream cheese.
- Heavy Cream: Whip until you achieve firm peaks for structure in the cheesecake. Look for cream that has 36-40% butterfat.
- Powdered Sugar: Sift if needed to eliminate lumps before use.
- Sour Cream: This should also be at room temperature for easy incorporation.
- Vanilla Extract: Opt for real vanilla extract for the best flavor. It may cost a bit more, but the taste is worth it!

How to Make No-Bake Oreo Cheesecake
Making a no-bake cheesecake is refreshing because it eliminates the need for baking altogether. With no eggs or flour in the mix, it’s all about chilling those layers to perfection!
- Start by preparing the crust. Combine melted butter with cookie crumbs—adding a touch of sugar if you desire. Press this mixture into the bottom and up the sides of a springform pan. This kind of pan is ideal since it allows easy release without damaging the cake.
- Refrigerate the crust for about 30 minutes to let it firm up and stabilize.
- Next, prepare the first layer of ganache. Heat the cream in a microwave-safe bowl until it’s almost boiling. Pour in the chocolate chips, cover with a paper towel, and let it sit for a minute. Stir until the mixture is completely smooth and pour it over the chilled crust. Chill again for another 30 minutes.
- Now, let’s whip up the cheesecake filling. Beat the cream until you reach firm peaks and set aside. In a separate bowl, mix the room temperature cream cheese until smooth. Gradually add powdered sugar, followed by sour cream and vanilla extract. Once combined, gently fold in the whipped cream and mini chocolate chips.
- Pour the cheesecake batter over the ganache layer in the crust, smoothing the top for a lovely finish. Cover it up and place it in the freezer for about 2 hours to let it set.
- While the cheesecake is chilling, make the ganache topping by heating cream again until nearly boiling. Add the chocolate chips and cover with a paper towel, let it sit for a minute, then stir until smooth. Spread it over the chilled cheesecake.
- Let the cheesecake set in the freezer for another 10 minutes. After that, gently remove the sides of the springform pan. If you’d like, transfer it to a serving plate.
- For that finishing touch, garnish with whipped cream swirls around the edges and top each swirl with a mini Oreo for that delightful presentation!
Expert Tips
- For the smoothest filling, ensure your cream cheese and sour cream are at room temperature before mixing.
- When whipping cream, aim for firm peaks. This is crucial for the cheesecake’s structure; if the peaks don’t hold, the filling will turn out too loose.
- Keep in mind that a not-so-stiff filling may lead to difficulty in slicing. So take care to whip that cream well!
- To create beautiful garnishes, consider using a piping bag with a 1M tip to form swirls of whipped cream. Add mini Oreos for an adorable finish!
Frequently Asked Questions
A no-bake cheesecake can be safely stored in the refrigerator for around 3-5 days, provided it hasn’t been left out at room temperature for over 2 hours. However, note that any garnishes like mini Oreos may soften over time.
Can a No-Bake Cheesecake Be Frozen?
Absolutely! You can freeze both no-bake and regular cheesecakes. After chilling, wrap them in plastic wrap and foil before freezing for up to 3 months. Keeping the cheesecake in the springform pan is a great way to protect it during freezing. You can also slice it into individual pieces before freezing for easier serving later.
Why Didn’t the Filling Thicken?
If the whipped cream isn’t beaten to firm peaks, the filling won’t set properly. Additionally, ensure you’re using regular cream cheese in blocks—not the spreadable versions—as that can also affect the consistency.


